Introduction
Remember, my target goal for these Learn to Code posts is non-programmers and non-computer science geeks. I’m trying to make as few assumptions as possible about your existing knowledge of programming and computer software in general. When I was learning programming, I needed something to fill in the dummy gaps, and my goal is to provide some of that for the folks who might be coming up behind me.
This post is heavier on abstract ideas than practical solutions, as I feel a need to explain why I’m offering a cheat first rather than following a more traditional route into the code. So get ready for some rambling! If you want to skip some of my philosophizing on programming tutorials and just get straight into recording macros, you can gostraight to the section under Microsoft Word’s Macro Recorder.
Scope of Application
Today’s post relies on Microsoft Word 2013 running on a Windows 8.1 machine. But what I’ll cover applies at least as far back as Word 2007 and Windows XP and the equivalent versions of Word for the Mac. If you don’t have Word, you can get a trial copy from Microsoft’s website.
Hello, World!
Most “Learn to Program” guides start with what’s called a “Hello, world!” program (HWP). These are minimal programs that get your computer to display the text “Hello, world!” on the screen. They’re designed as introductory learning tools. But somebody recently sent me this image about programming tutorials, and it reminded me of some of the challenges of introducing people to programming:

Hello, World! Next step, build Google.
I’m no artist, but I can draw some circles… Ok, I can’t. My circles always turn out looking like ovals that somebody put in the microwave to see what would happen. But that’s lucky for you. If I could draw circles, what would the butterfly effect of that be? Probably wouldn’t be here writing this blog. So my sucky drawing skills say “You’re welcome.”
Anyway, I can draw deformed ovals. I’m also excellent at “Hello, world!” programs–as you undoubtedly will be. And I’ve got nothing against them. HWPs are great for doing something quick and easy in a new language, and I love instant gratification. It’s why I binge-watch TV and buy M&M’s at the gas station. (Nabisco, if you don’t sponsor my blog, I’ll buy more other things at the gas stations. Those M&M’s could have been Oreos.) But HWPs (Hello World Programs) aren’t as great introductions for total noobs as they’re sometimes thought to be.
To oversimplify, HWPs work best as an introduction to driving an unfamiliar car. “Hey, you know how in your car, the windshield wiper control is on the right? Well, here, it’s on the left. And those stereo controls on the wheel? This car doesn’t have them. Oh, and the headlights aren’t on that lever on the steering column. There’s a button on the dash over there–yeah, that’s it.”
Any two cars have the same basic functionality, but the location of controls and how they’re labeled might vary greatly. And maybe one has heated seats and the other doesn’t. Programming languages are the same way. They share an incredibly long list of basic functions, but the names of those functions and how you access them can seem worlds apart at first glance. And every language has its own set of bells and whistles. Imagine, though, that you’ve never seen a car before, or that what you really want to understand is how turning that knob on the lever sticking out of the steering column makes the windshield wipers move. You would be looking for a different entry point to the conversation.
It’s unfair to say that all HWPs are sub-par introductions to first-time programmers with no computer science background. But how are those noobs supposed to recognize the difference between an HWP that will appeal to someone starting from scratch and one that is built for experienced users transitioning to a new language? Tutorials are getting better at identifying prerequisite knowledge or experience, but I think the inspiration for the owl cartoon above is the vast majority of tutorials that take a reader’s knowledge for granted. For self-starters who don’t have a mentor or a safe space to ask questions, those tutorials can be a huge turnoff. They make programming seem as mysterious as quantum physics or the rise of bronies.
I’ve done my fair share of HWPs and still do. They’ll always serve the appropriate audience well. But I found a side door into the code that was really instructive for me. It’s cheating, for sure. But it was the best learning tool I could have asked for: recording macros. It won’t land you a job at Amazon or anything. (Trust me. They were not at all impressed with my macro skills when I interviewed there.) But it will give you a leg up if you have a mind like mine–and I’m assuming you do, or else you’d be out doing an HWP in Python right now.
Macros
You’ve heard of macros, right? Some nerd at your office or in one of your classes makes their own macros or downloads them from the internet. The term macro can actually be applied to certain structures of computer code in general, but they’re most commonly associated with Microsoft’s Office suite of programs–especially Excel.
We need a quick definition of macro for our discussion, so I’m going to say you can think of a macro as a recipe. Say we have a macro called “Peanut Butter Sandwich.” We write the step-by-step instructions for making the sandwich only once. From then on, any time we want the computer to make a peanut butter sandwich (which should probably be the ultimate goal of computing), we just say “Peanut Butter Sandwich.” The computer then reads that recipe and does each of the steps.
Dummary (dummy’s summary): As long as we know the recipe’s name (macro name), we can prompt the computer to do all the steps in the recipe just by telling it the name.
Wait, wait, wait… I hear software developers referring to themselves as JavaScript Ninjas and Agile Samurais–or the less cool sounding but still endearing “Code Monkey.” You make it sound as if they’re more like a bunch of Julia Childs… Julia Children?… Rachel Rays.
Umm… I think there’s a healthy middle ground:

Chef Louis from Disney’s The Little Mermaid
Microsoft’s Office suite has a set of tools that allows you to create your own macros to automate tasks you do over and over again. But instead of having to write the recipe, you can record it. The software will then let you name your recipe and designate a way to call it up and tell the computer to follow it.
Microsoft Word’s Macro Recorder
More and more tools are emerging that demonstrate code in action in real time, but the one that really served me starting out was Microsoft Word’s macro recorder. It’s actually pretty awesome, and if this is the closest you ever get to programming, it will be a big value add in most professional environments. Excel and PowerPoint have the same tools, but I’m going to focus on Word for now.
Recording macros is easy, but before you can do it, you have to give yourself access to the macro tools by turning on the Developer tab in the ribbon.
Your ribbon in Word should look something like the screenshot below. I’m using Word 2013, so the style of yours may be different, but the content should be more or less the same.

We’re going to click the File tab, and select “Options.”

In the dialog window that pops up, select “Customize Ribbon” from the panel on the left:

When those options load, you’ll see a box on the right with a list of all the tabs. All the ones with check marks by them are on and available when you open Word. Anything without a check mark is turned off.

Just past the halfway point on that list, you should see the value “Developer,” and unless you’ve already been fiddling with macros, the box next to it is probably not checked. Click the checkbox or the word “Developer” to turn it on:
![]()
Click the “Ok” button on the dialog window, and now you’ll see the Developer tab in your ribbon:

Go ahead and click on it to open it up. It should look something like this:

There’s a lot here, but we’re going to concern ourselves only with the Code group on the left:

Quick diversion
In case you’re not familiar with the terminology of Word’s thingamajigs, here’s a quick review:
- That big bar along the top that showed up around 2007 is the ribbon. If you used Word before then, you were mad about it for at least a couple years. If you didn’t get to college before 2008, you don’t understand what all the fuss was about. You also don’t know who Clippy is and why this clip from NPR’s Wait Wait… Don’t Tell Me! is hilarious.
- The ribbon is divided into tabs, which is pretty standard currency. You’ve got a grip on that.
- The tabs are divided into groups, which are usually separated with a vertical bar or pipe. On the Home tab, for example, the three left-most groups are Clipboard, Font, and Paragraph. See those vertical bars in between?

That’s where one group ends and the next begins. Some of them are a little arbitrary, but most of them make sense.
- Within the groups are controls. Every little button and dropdown is a control.
- Dummary: When you click the big bold B to make text bold, you’re using the bold control within the Font group on the Home tab of the Word ribbon.
Back on Track
You see where this is going. There’s a record button staring you in the face.
Don’t Write Code. Watch it Happen!
When I was first learning to code, I read a lot of sample programs. We’ll talk about that more later. The problem is that programs of any complexity get unwieldy pretty quickly. Sophisticated programs require sophisticated setup. So even when I wanted my code to reproduce existing actions in a program like Word, I didn’t know how to find that particular action in sample code. I kept thinking, “What if I could just see the code for what I’m doing right now separate from everything else?” Turns out the macro recorder makes that possible. It has some limits, of course, but it let’s you essentially watch code being built.
First, write or copy a couple of paragraphs in Word. I borrowed mine from Don Quixote, because it keeps coming up and I’m trying to remind myself that I should read it.
I’m going to keep this really simple. When I was working in the document production department of a law firm, one of the things we constantly came across was a difference in preferences among the lawyers about whether they wanted one or two spaces after a period. I’m a one-space-after-the-period kind of guy. I have my reasons, but I’ll save that discussion for when we meet at a dinner party somewhere. Cuz that’s the best dinner party conversation I have. I don’t want to use it up here.
You probably already know that Word has a Find and Replace feature. You just hit Ctrl + H, and that little box comes up.

I put a period and a single space(“. “) in the Find box and a period followed by two spaces (“. “) in the Replace with box, click Replace All, and the work is done. Yeah, if there were abbreviations like “Dr.” and “Ms.” then I have to go back and fix a few things. I’m going to get to that in a later post. Suffice it to say for now that this couldn’t be much easier.
Here’s the rub: I know that I’m potentially going to do this 100 times a week. While hitting Ctrl-H and typing a couple periods and a few spaces only takes a few seconds, I also make the occasional typing mistake. Plus, 3 seconds 100 times a week is 300 seconds. That’s 5 minutes a week, 50 weeks a year… Over 4 hours! That’s 4 x my hourly rate every year to have me do something that the computer could do almost instantly if I had a button for it.
That might seem ridiculous, but if you’re part of a mid-sized or large organization, some number cruncher somewhere is doing calculations like that, or they’ll hire some Six Sigma black belt to come do it when they want to improve efficiency. Thinking about these things is also how you add business value. “Hey, boss, if you let me implement this solution with my team, it’ll cost you nothing and save you $2,000 over the next 5 years.” (Yes, on a team of document production folks in a mid-sized company, a simple macro could theoretically save a company that amount of money over that range of time. No joke. Of course, few custom programming solutions cost nothing. This is pretty unique ROI.)
So how do I take this one task and turn it into a macro? Record it.
Record Your First Macro
On the Developer tab, click the Record Macro button.

A Record Macro dialog will come up asking you to name the macro and assign it to a button or a keystroke. For now, just give it a name and click Ok. I’m going to walk you through how to add it as a button later. Your pointer now has a little cassette tape attached to it, because recording stuff used to have something to do with magnetic strips inside plastic cassette cases. Look it up, kids.

The record button also has changed to a Stop Recording button, and the Pause Recording button is clickable:
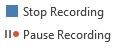
The first time I did this, I thought time mattered. Why else would there be a Pause button? Turns out that your macro recorder doesn’t care how much time you spend doing anything. It doesn’t track time; it only tracks actions. So while you’re reading this paragraph, Word isn’t recording anything. The time between when you hit the Record button and when you actually do something it will record won’t be part of the macro.
The Pause button tells Word to ignore actions. You can leave out stuff you want to do now but that you don’t want the macro to repeat in the future.
You could just go straight into recording the macro, but I want you to see some of the magic happening, so hit Alt + F11. This opens up a code editor that looks something like this:

We’ll look at all the bells and whistles later. Right now, look for a window on the left that says “Project – Normal” at the top. This is the Project Explorer Window. If you don’t see it, press Ctrl + R.
Within that window, you should see a selection tree that looks something like this:

Double-click the label “NewMacros.” Don’t worry about that weird symbol next to it for now. A text editing window opens up with the code for your macro.
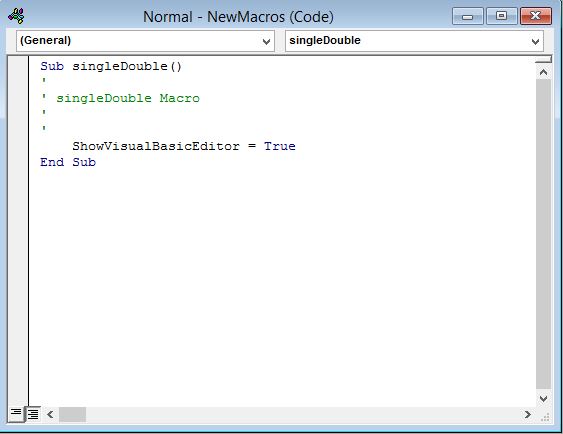
See how it has the name “singleDouble” at the top? It’s calling it a Sub, which, again, we won’t worry about for right now. (“Don’t worry about that right now” is a mantra for all Learn-to-Code tutorials. There’s just no getting around it.)
The line that’s in there right now, “ShowVisualBasicEditor = True”, was recorded when we opened up this code editor. Next time you run the macro, it’s going to do that again. You can erase it if you want. I’m going to leave it in mine for now.
Leave that window up where you can see it, and go back to your sample document in Word. Press Ctrl+H. Nothing happens in your code window. Don’t worry. It’s still recording.
Enter your find and replace terms: period followed by one space (“. “) and period followed by two spaces (“. “). Still, nothing happens in your code window. I promise it’s still recording. Your cassette is still there.
Click Replace All and then clear any dialogs that come up. Did your code window just fill up?
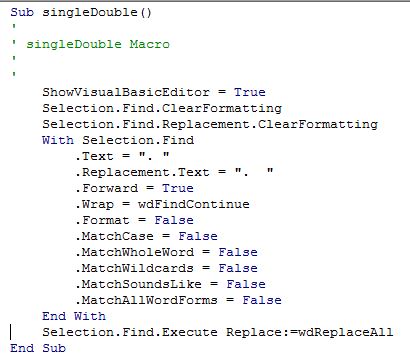
Yeah it did. In the next post, I’m going to go over all of this in excruciating detail. Right now, I want you to go back to your Developer tab and hit Stop Recording.
You did it. You recorded a macro. But I stopped you from assigning it to a button or a keystroke earlier. So you can’t run it again without going into this code editor, pulling it up, and hitting the play button in there.

Crud. Ok. I’ll show you how to add a button to your Quick Access toolbar, but then I’m folding laundry and watching Downton Abbey.
Your Quick Access toolbar is that strip of buttons that resides just above or just below your ribbon, depending on your preferences. I keep mine below the ribbon. Yours may look a little different than mine, but it will have small icons and a little down arrow on the far end of it:

Click that arrow and select “More Commands…” from the menu that appears.

Your Options dialog comes up focused on the section for customizing the Quick Access toolbar. The column on the left is all the things you can choose from, and the column on the right is all the stuff currently in your Quick Access toolbar.

Find the dropdown above the column on the left labeled “Choose Commands From” and select Macros.

Unless you’ve got some extra add-ins or other custom tools installed, the only thing in the list should be the macro you just recorded.

It’s got a weird symbol next to it and a longer name than you thought you gave it, but that’s definitely it. Hit the “Add>>” button to include it in the Quick Access toolbar, and then click Ok. A button for your macro with that weird symbol should now show up on your toolbar.

Click it! Click it! Then click it again! And again! You’re excited!
Uh-oh… Every time you run it, it adds more space between the period and the next sentence. This is not exactly what we wanted. But there’s some good news here, too. Even though it didn’t do what you wanted it to, or what you thought it would, it did exactly what you told it to. It works! You pushed a button and made something happen that Word didn’t do on its own. You’re a (cheater) programmer!
This might be a little frustrating, but I’m going to end this post here and leave you with a couple challenges. First, figure out why the macro keeps adding space. Then, see if you can fix it. In the next post, I’m going to keep my promise and elaborate on the code in detail. I’m going to really drag it out and fill in the dummy gaps.
It’s about to get fun. Programming is problem-solving. That’s the primary aim. And it’s mostly about solving problems you didn’t expect, like this one. If you figure it out between now and the next post, leave your answer in the comments. I’ll be back soon with my answer.
Love and kisses,
Tyler

Good day! I know this is kinda off topic however I’d figured I’d ask.
Would you bbe interested in exchanging links or maybe guest authoring a blopg post orr
vice-versa? My site covers a lot of the same topics as yours and I feel we
could greatly benefit from each other. If yoou are interested
frel free to send mee an e-mail. I look forward to hearing
from you! Wonderful blog by the way!
Absolutely! I’d be happy to exchange links and guest authoring. What did you have in mind?
I loved your dialogue, and read it all thro’ before going to word to get cracking. Imagine my chagrin when I discovered that my ribbon was exactly like yours with one dreadful exception – there was no File category!! I mastered it on XP, but my experience in jumping from XP to 8.1 is not very pleasant, maybe I should have spent much more money and climbed the ladder one step at a time – I am sure Bill would have appreciated that more kindly. I couldn’t believe my eyes when there was no file on my ribbon, it certainly looked the same on you example. Can you please help?
It’s been months since I’ve opened a Windows computer (enjoying being a stay-at-home dad right now and all my work is on Linux). Have you considered posting on stackoverflow.com?